
After selecting the wrench tool icon on the banner atop the GUI, the Settings of the Solis Hub will appear.
The Settings is where users can toggle the Solis Hub between Virtual and Physical Sim, rename the default SSID (network name), change the default Wi-Fi password, set the Wi-Fi security mode, scan for access points, enable or disable WPS functions, and set the Wi-Fi band as either 2.4GHz or 5.0GHz, amongst other features. It is divided into five distinct sections which all have their own subsections.
WAN
The WAN page is used to configure the parameters for the internet network that connects to the WAN port of the Solis Hub. The page is divided into six distinct sections, those being Default Route, SIM Mode, IPv4, IPv6, Status, and VLAN.
Default Route
The Default Route page enables the user to select which WAN connection (WAN1 or Cellular) provides the source of the internet to the Solis Hub.
Selecting “enable WAN failover to Cellular”, allows the Solis Hub to automatically continue providing internet through Virtual Sim if the router that you connected to it via the WAN port has failed.
SIM Mode
The SIM Mode page is used as a toggle between a Physical SIM inserted in the router for access to the internet and a Virtual built into the router for same purpose.
Virtual SIM
Make sure that Virtual SIM is selected so that your Solis Hub will work on your data plan.
When using a Physical SIM card, toggle to Physical SIM and a menu will appear. Once you have inputted your desired changes click “Save & Apply”.
The Solis Hub will reboot with your saved changes after 30 seconds. Be sure to connect to the Solis Hub’s Wi-Fi network once the reboot is complete.
Physical SIM
| Item | Description |
| SIM Mode | Physical Sim or Virtual SIM |
| User Name | The username associated with your physical sim data plan. |
| Password | The password associated with your physical sim data plan. |
| APN | The APN provided by your internet service provider. |
| PIN | The PIN provider by your internet service provider. |
| Auth Method PAP | Password Authentication Protocol |
| Auth Method CHAP | Challenge-Handshake Authentication Protocol |
IPv4
The IPv4 page is used to toggle between three WAN Access Types (modes) that can be used; DHCP, Static IP, and PPPoE. A fourth mode is available and takes the form of a VLAN tag and can be used if necessary.
DHCP (Dynamic IP)
Selecting the Dynamic IP (DHCP) WAN Access Type will enable the router to automatically obtain IP addresses, subnet masks, and gateway addresses.
Selecting Dynamic IP (DHCP) WAN Access Type also enables you to set the MTU to allow smaller or larger data packages to flow into the Solis Hub. You should not have to adjust this metric.
For large locations such as an office building or campus with a large grouping of computers or other devices all located in the same place, VLAN can be enabled.
| Item | Description |
| MTU | Minimum Transmission Unit (to be kept as default). |
| VLAN ID | Identifies the VLAN to which a data frame belongs. |
Static IP
Selecting the Static IP Access Type will enable the router to support Static IP as a WAN connection type.
| Item | Description |
| IP Address | The cellular signal strength of the Solis Hub. |
| Subnet Mask | A number that resembles an IP address. It reveals how many bits in the IP address are used for the network by masking the network portion of the IP address |
| Default Gateway | The IP address of another router your SOLIS HUB sends traffic too. |
| DNS 1 | Domain Name System 1 |
| DNS 2 | Domain Name System 2 |
| MTU | Minimum Transmission Unit (to be kept as default). |
| VLAN ID | Identifies the VLAN to which a data frame belongs. |
PPPoE
Selecting the PPPoE Access Type will enable the router to support PPPoE as a WAN connection type.
| Item | Description |
| VLAN ID | Identifies the VLAN to which a data frame belongs. |
| Service Name | Solis Hub |
| MTU | Minimum Transmission Unit (to be kept as default). |
| Connection Type: Continuous | Continuous |
| Connection Type: Connect on Demand | Connect on Demand |
|
Connection Type: Manual |
Manual |
IPv6
By enabling IPv6, a collapsable menu will appear, enabling the user to toggle between three distinct origin types, STATIC, AUTO, and 6RD.
STATIC
| Item | Description |
| IP Address | The cellular signal strength of the Solis Hub. |
| Default Gateway | The IP address of another router your Solis Hub sends traffic too. |
| DNS 1 | Domain Name System |
| MLD Proxy | Multicast Listener Discovery |
AUTO
| Item | Description |
| Stateful Address | DHCP will supply an IPv6 address. |
| Stateless Address | DHCPv6 server does not provide IP addresses at all. |
| DUID | The DUID identified a DHCPv6 device. |
| PD | Prefix Delegation. |
| MLD Proxy | Multicast Listener Discovery. |
6RD
| Item | Description |
| 6RD IPv6 Prefix | WAN IPv6 prefix delegation. |
| WAN IPv4 Address | WAN IPv4 Address. |
| 6RD Border Relay IPv4 Address | Border Relay IPv4 Address. |
| DNS | Domain Name System. |
| MLD Proxy | Multicast Listener Discovery. |
Status
The Status page will display the status of each WAN connection; WAN1, WAN2, WAN3, WAN4.
VLAN
The VLAN page is used to configure the VLAN settings.
Operation Mode
The Operation Mode page is used to toggle the Solis Hub between the different operational modes, Gateway, Bridge Mode, and Wireless ISP.
The Solis Hub must remain on Gateway mode to work with your data plan.
Wi-Fi
The Wi-Fi section is used to configure the Solis Hub's Wi-Fi settings.
Basic
The Basic page is used to toggle between and set up both the 2.4GHz and 5.0GHz Wi-Fi interfaces (bands).
Wi-Fi as a feature can also be shut off on this page by selecting the ‘Disable Wireless LAN Interface’ box.
The Solis Hub's SSID (network name) and guest SSID can both be edited on this page. Edits include the ability to rename the SSID and toggle its broadcasting status (whether or not it comes up as an option when users are viewing available Wi-Fi networks to connect to on their mobile devices). In addition, users can view Associated Clients which provides a list of all devices connected to the Solis Hub's Wi-Fi network at that exact moment.
For more technically savvy users, the Wi-Fi channel width, sideband, and number can all be toggled from within the Wi-Fi page as well.
| Item | Description |
| Disable WIreless LAN Interface | You may choose to enable or disable the wireless function. |
| Wireless Band | Default is “Mixed 802.11b/g/n”. It is strongly recommended that you set the Band to “802.11b/g/n”, that way all 802.11b, 802.11g, and 802.11n wireless stations can connect to the Solis Hub. |
| Multiple AP | You can set the guest SSID from this button. |
| Network Type | You can configure the WLAN network type with this parameter. |
| SSID | Set a Wi-Fi name (SSID) for your wireless network. If you switch to Client Mode, this field becomes the SSID of the AP you want to connect with. |
| Channel Width | Select a proper channel bandwidth to enhance wireless performance. When there are 11b/g and 11n wireless clients, please select the 802.11n mode of 20/40MHz frequency band. |
| Control Sideband | Control channels are only applicable if your gateway is operating at 40 MHz bandwidth and the 802.11n mode is configured as Automatic. |
| Channel Number | For optimal wireless performance, you may select the least interferential channel. It is advisable that you select an unused channel or “Auto” to let the Solis Hub detect and select the best possible channel for your wireless network to operate on from the drop-down list. |
| Broadcast SSID | You may choose a visible or invisible SSID broadcast. When it is enabled, the Solis Hub’s SSID will be broadcast in the wireless network so that it can be scanned by wireless clients and they can join the wireless network with this SSID. |
| WMM | WMM provides basic Quality of service (QoS) features to IEEE 802.11 networks. WMM prioritizes traffic according to four Access Categories: voice, video, best effort, and background. |
| Associated Clients | This option shows you all the clients who are connected to a SSID. |
| Enable Universal Repeater Mode | Repeater mode. |
Selecting Show Active Clients leads to the Active Wireless Client Table which displays a list of the current devices that are connected to the Solis Hub at any given point in time.
Selecting Multiple AP leads to a view of the wireless settings for multiple APs.
Security
The Security page is used to set the Wi-Fi encryption type.
| Item | Description |
|
Encryption |
Select the security mode from the Encryption drop-down list. There are 4 options in the Security Mode drop-down list:
|
| Enterprise (RADIUS) | Remote Authentication Dial In User Service |
| TKIP | Temporal Key Integrity Protocol |
| AES | Advanced Encryption Standard |
ACL
The ACL page enables user’s to specify which wireless device MAC addresses are permitted to connect to the Solis Hub's Wi-Fi network and which are not permitted.
Keep this mode disabled if you want to keep your Wi-Fi free for any device in your home to connect too without limitation.
| Item | Description |
|
Wireless ACL Mode |
If you choose 'Allowed Listed', only those clients whose wireless MAC addresses are in the access control list will be able to connect to your Access Point. When 'Deny Listed' is selected, these wireless clients on the list will not be able to connect to the Access Point. |
| MAC Address | The MAC address of the client. |
Site Survey
The Site Survey page enables user’s to scan all the Wi-Fi networks available to them in the immediate vicinity of the Solis Hub.
When the Solis Hub is set in client mode, it can act as a repeater and connect to those specific Wi-Fi networks, rendering the plan unusable.
WPS
The WPS page enables the user to change the settings for Wi-Fi Protected Setup. Specifically enabling the user to enable or disable WPS, and permit certain devices to connect to the Solis Hub via WPS.
| Item | Description |
| WPS | This page allows you to change the setting for WPS (Wi-Fi Protected Setup). Using this feature could let your wireless client automatically synchronize its setting and connect to an Access Point in a minute without any hassle. |
| Disable WPS | Enable or disable WPS function. |
Wi-Fi Schedule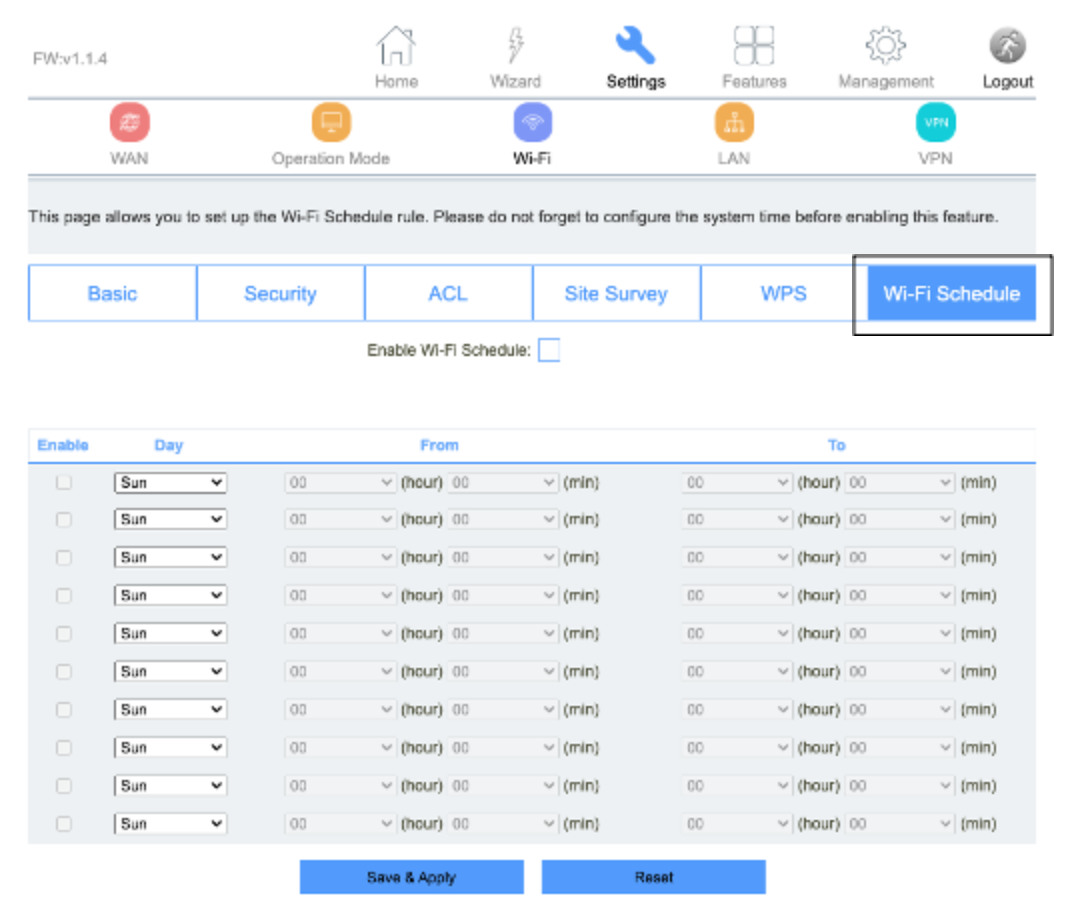
The Wi-Fi Schedule page allows you to set the times and days when the Solis Hub emits and does not emit a Wi-Fi signal.
LAN
The LAN section enables the user to configure the parameters for the local area network.
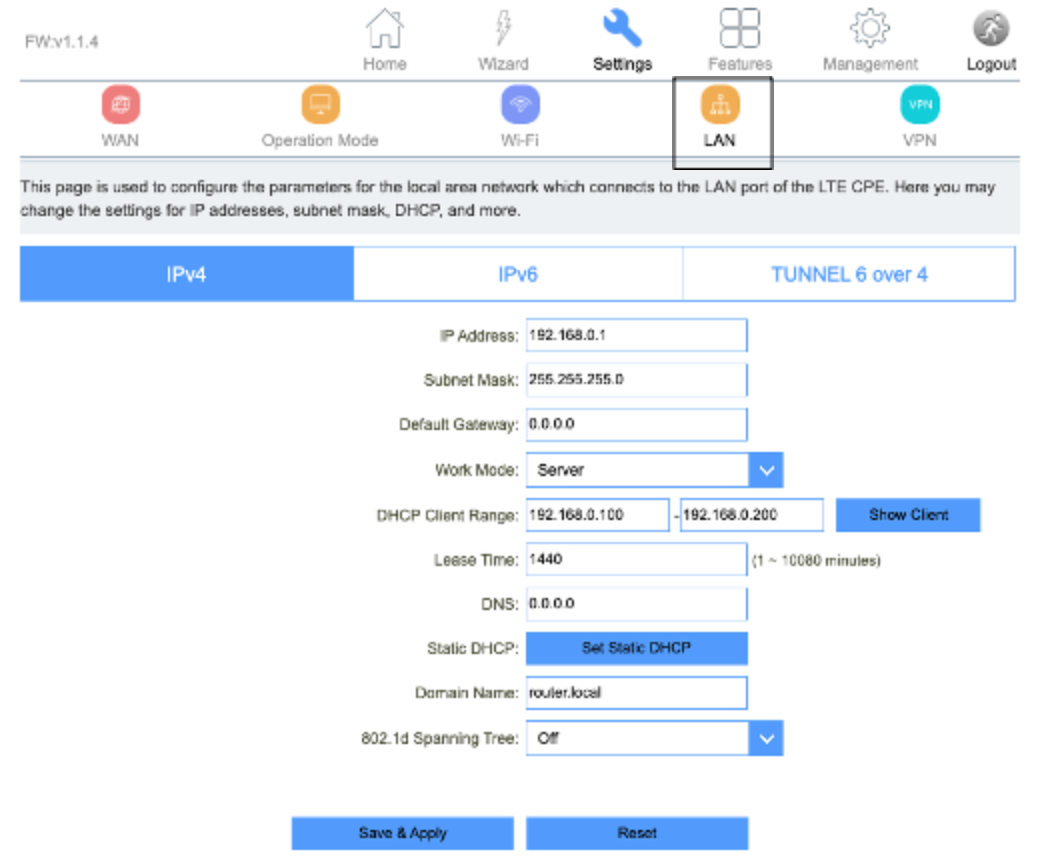 IPv4
IPv4
The IPv4 page enables the user to change the settings for several LAN-related parameters with focus on settings around the DHCP function.
| Item | Description |
| LAN IP Address | The default is 192.168.0.1. You can change it according to your needs. |
| Subnet Mask | The router’s LAN subnet mask. |
| Work Mode |
If this is selected, the router serves as the DHCP server and automatically assigns IP addresses to all computers in the LAN. |
| DHCP Client Range | Enter the start and end IP address of all the available successive IPs. |
| Lease Time | Select the time for using one assigned IP from the drop down list. After the lease time, the AP automatically assigns new IP addresses to all connected computers. |
| Static DHCP | This page allows you to reserve IP addresses, and assign the same IP address to the network device with the specified MAC address any time it requests an IP address. This is almost the same as when a device has a static IP address except that the device must still request an IP address from the DHCP server. |
| Domain Name | Set the domain name of the server. |
| 802.1d Spanning Tree | Enable or disable spanning tree function. |
Static DHCP
Entering the Static DHCP page by clicking the “Set Static DHCP” button enables users to reserve a specific IP address for a device by granting them access to bind the MAC address of the said device to an IP address that is specified by the user on this page.
Click the “Set Static DHCP” button also reveals the RADVD page.
IPv6
The IPv6 page enables the user to permit the Solis Hub to serve as the DHCP server and automatically assigns IPv6 addresses to all connected mobile devices on the LAN.
| Item | Description |
| IP Address | Router’s LAN IPv6 address. |
| RADVD | Router Advertisement Dameon |
| Stateful Address | DHCP will supply an IPv6 address. |
| Stateless Address | DHCPv6 server does not provide IP addresses at all. |
| 6RD IPv6 Prefix | WAN IPv6 prefix delegation. |
RADVD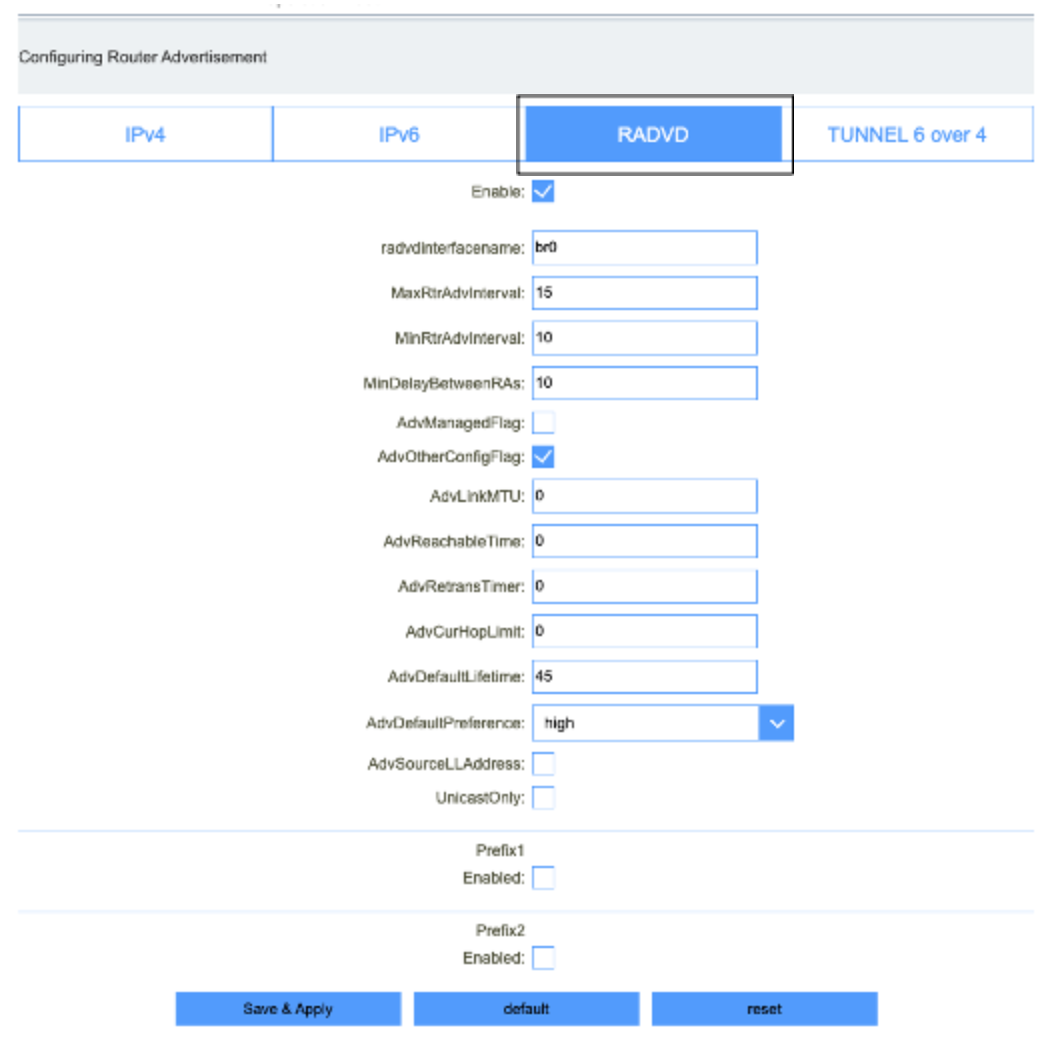
The RADVD page enables the user to set up all the settings around IPv6 RADVD, including the specified time delays between packets, maximum and minimum retry intervals, and advertisement settings.
| Item | Description |
| radvdinterfacename | Interface name. |
| MaxRtrAdvInterval | Max retry advertisement interval. |
| MinRtrAdvInterval | Min retry advertisement interval. |
| MinDelayBetweenRAs | Min delay between router advertisement. |
| AdvManagedFlag | Advertisement managed flag. |
| AdvOtherConfigFlag | Advertisement other config flag. |
| AdvLinkMTU | Advertisement link MTU. |
| AdvReachableTime | Advertisement reachable time. |
| AdvRetransTimer | Advertisement retrains timer. |
| AdvCurHopLimit | Advertisement current hop limit. |
| AdvDefaultLifetime | Advertisement default lifetime. |
| AdvDefaultPreference | “High”, “medium” or “low” for the advertisement default preference. |
| AdvSourceLLAddress | Advertisement source link local address. |
| UnicastOnly | Unicast only. |
| Prefix1 Enabled | Enable or disable prefix. |
| Prefix | Enter the prefix and prefix length. |
| AdvOnLinkFlag | Advertisement on link flag. |
| AdvAutonomousFlag | Advertisement autonomous flag. |
| AdvValidLifetime | Advertisement valid lifetime. |
| AdvPreferredLifetime | Advertisement preferred life time. |
| AdvRouterAddr | Advertisement router address. |
| If6to4 | Enter the interface 6to4. |
TUNNEL 6 over 4
The TUNNEL 6 over 4 page enables users to either enable or disable tunnel 6 over 4.
| Item | Description |
| Enable | Enable or disable tunnel 6 over 4. |
VPN
The VPN section enables the user to configure the settings for PPTP, L2TPv2, and L2TPv3 and view the Status of each.
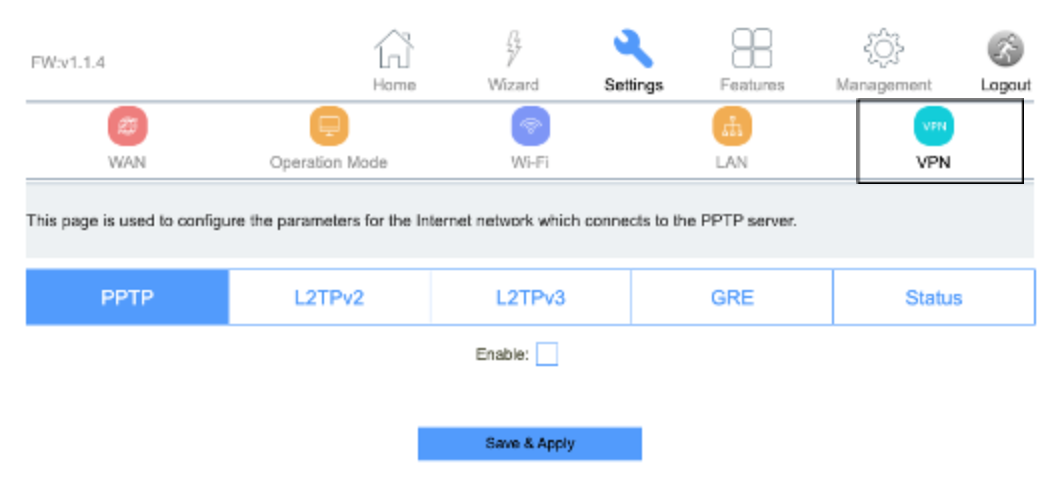 PPTP
PPTP
The PPTP page enables user’s to configure the parameters for the internet network which connects to the PPTP server.
| Item | Description |
| Server | The name of PPTP Server. |
| Username | The user name provided by the cellular carrier. |
| Password | The password provided by the cellular carrier. |
| MTU | You can keep the maximum transmission unit (MTU) as default. |
L2TPv2
The L2TPv2 page is used to configure the parameters for the internet network which connects to the L2TPv2 server.
| Item | Description |
| Server | The name of L2TP Server. |
| Username | The user name provided by the cellular carrier. |
| Password | The password provided by the cellular carrier. |
| MTU | You can keep the maximum transmission unit (MTU) as default. |
L2TPv3
The L2TPv3 page is used to configure the parameters for the internet network which connects to the L2TPv3 server.
| Item | Description |
| Local Host Address | The address of the LAN side device of the local, eg:192.168.0.2. |
| Remote Host Address | The address of the LAN side device of the remote host, eg:192.168.8.2. |
| Local Udp Port | Lan side device udp port. |
| Remote Udp Port | Remote device udp port. |
| Tunnel Address | Wan interface ip address. |
| Remote Tunnel Address | Remote device wan interface ip address. |
| Tunnel Id | Local device tunnel id. |
| Remote Tunnel Id | Remote device tunnel id. |
| Session Id | Local device session id. |
| Remote session Id | Remote device session id. |
| MTU | You can keep the maximum transmission unit (MTU) as default. |
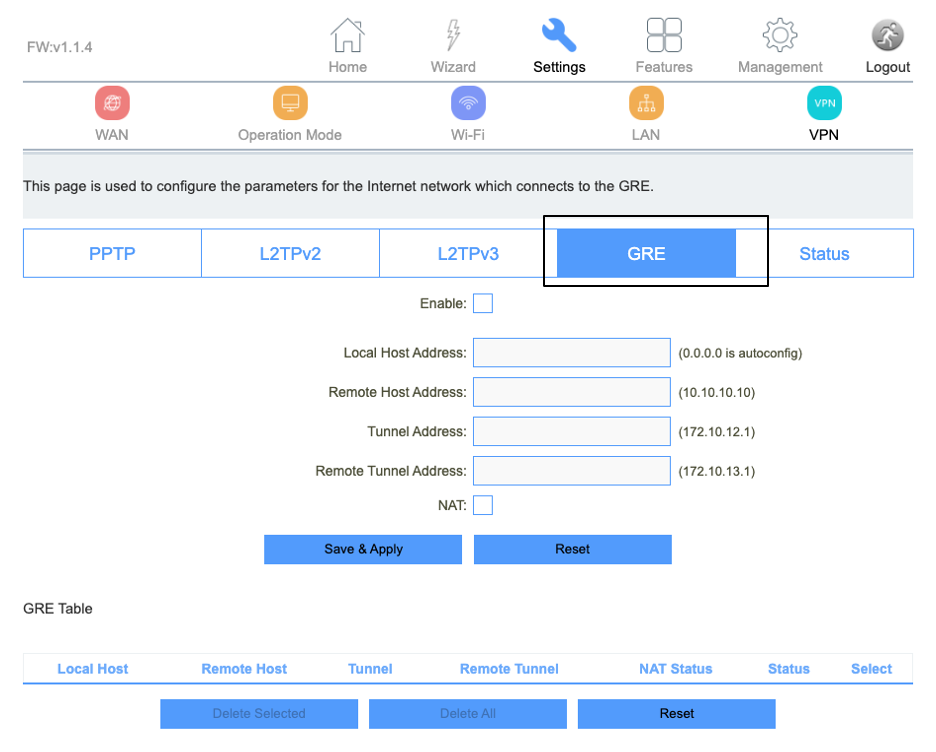
GRE (Not supported with vSIM)
The GRE page is used to configure the parameters for the internet network which connects to the Generic Routing Encapsulation tunneling protocol.
 Status
The Status page presents an overview of the status information for PPTP, L2TPv2, and L2TPv3.
Comments
Please sign in to leave a comment.